Processing Big Game
Capt. Clark
14th & 22nd December 1805
All employd in finishing a house to put meat into. all our 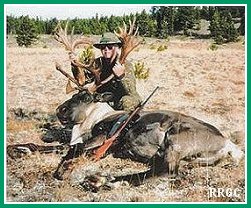 last Supply of Elk has Spoiled in the repeeted rains which has been fallen ever Since our arrival at this place,-We discover that part of our last Supply of meat is Spoiling from the womph of the weather not withstanding a constant Smoke kept under it day and night. last Supply of Elk has Spoiled in the repeeted rains which has been fallen ever Since our arrival at this place,-We discover that part of our last Supply of meat is Spoiling from the womph of the weather not withstanding a constant Smoke kept under it day and night.
*
Once the game has been field dressed and transported out of the woods the next steps are aging, skinning, butchering/boning and preserving/freezing. There are a number of decisions that need to be made during these steps such as having the game process by a commercial facility or doing it yourself. In either case you will need to decide on how long the game should be aged, what type of meat cuts and size meet your needs, whether the meat is to be boned, if some of the meat will be used to make sausage, and how the meat will be preserved.
Aging
Meat that is hung to age before being cut and wrapped is generally regarded as more tender and flavorful. However, aging is not required for the meat to still be good table fare. Aging is a preference, not a requirement. It should be done with the skin on and with protection from flies.
 The ideal place to age meat is in a The ideal place to age meat is in a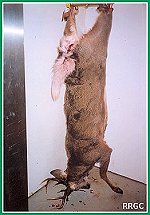 temperature and humidity controlled cooler, similar to those used by a butcher or meat marker. temperature and humidity controlled cooler, similar to those used by a butcher or meat marker.  The optimal temperature to age meat is 33 - 40 degrees F The optimal temperature to age meat is 33 - 40 degrees F  Depending on temperature, meat can also be hung outdoors, in a shed or anywhere in the shade where the sun does not contact and warm the meat. Depending on temperature, meat can also be hung outdoors, in a shed or anywhere in the shade where the sun does not contact and warm the meat. Meat may be hung (in the shade) when daytime temperature get as high as 70 degrees F if the meat was properly cooled immediately after it was harvested and night time temperatures drop down into the mid-40's or lower. Meat may be hung (in the shade) when daytime temperature get as high as 70 degrees F if the meat was properly cooled immediately after it was harvested and night time temperatures drop down into the mid-40's or lower. To help regulate the temperature of the meat, keep the meat covered with blankets or sleeping bags during the day and uncover the meat at night. To help regulate the temperature of the meat, keep the meat covered with blankets or sleeping bags during the day and uncover the meat at night. Meat that is hung in sub-freezing temperatures may freeze which stops the aging process and results in freezer burn. Meat that is hung in sub-freezing temperatures may freeze which stops the aging process and results in freezer burn.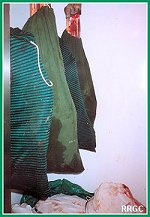  The normal time for aging the meat under the optimal temperature is 1 to 2 weeks taking into account the following factors: The normal time for aging the meat under the optimal temperature is 1 to 2 weeks taking into account the following factors:
 The aging process begins at the time of harvest. The aging process begins at the time of harvest. Time should be reduced if carcass is subject to higher temperatures. Time should be reduced if carcass is subject to higher temperatures. When an animal has been stressed, lactic acid build up in the muscle is reduced during aging. When an animal has been stressed, lactic acid build up in the muscle is reduced during aging. Aging is an enzymatic process that reduces acid build up and breaks down protein for more tender meat. Aging is an enzymatic process that reduces acid build up and breaks down protein for more tender meat. Some big game do not require as much aging (Antelope should only be aged 4 to 5 days). Some big game do not require as much aging (Antelope should only be aged 4 to 5 days).
 For best results the carcass should be For best results the carcass should be 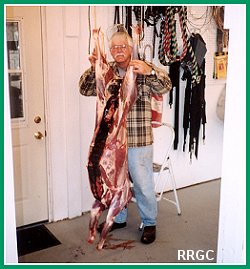 skinned after the aging period. If you skin the animal earlier, it will lead to a dried crust of meat on the outside of the carcass. This will cause overall drying of the meat and will need to be trimmed off before packaging. skinned after the aging period. If you skin the animal earlier, it will lead to a dried crust of meat on the outside of the carcass. This will cause overall drying of the meat and will need to be trimmed off before packaging.
Skinning
It is usually best to skin animals just before butchering or at a time that the carcass can be placed in a controlled atmosphere (walk-in-cooler) with appropriate cloth coverings and humidity. The equipment needed for skinning includes:
 Curved skinning knife or all purpose hunting knife Curved skinning knife or all purpose hunting knife Hanging method (tripod, mounted hooks, rope, block & tackle) Hanging method (tripod, mounted hooks, rope, block & tackle) Clean table area for the skinned carcass Clean table area for the skinned carcass
Care must be taken during skinning to assure that the meat stays clean. In some cases, touching the hair side of the hide to the meat can impart a strong and unpleasant flavor. Scent glands are located throughout the hide (antelope) or on the legs (other big game) and during skinning it is important to turn the hair side of the hide away from the meat. Throughout the skinning process it is important to wash your hands and utensils frequently to prevent contamination of the meat.
Skinning is best accomplished by hanging the carcass either from the neck or hind legs and then taking the following steps:
 Usually it is easier from the hind quarters to the head but from head to hind quarters will work (it is more difficult to hang from the head and keep the carcass stable). Usually it is easier from the hind quarters to the head but from head to hind quarters will work (it is more difficult to hang from the head and keep the carcass stable). Cut the hide down the legs, put the knife under the skin and cut outward to keep from cutting hair and also to reduce dulling of the knife. Cut the hide down the legs, put the knife under the skin and cut outward to keep from cutting hair and also to reduce dulling of the knife. Fold the skinned hide away from the meat. Fold the skinned hide away from the meat. Remove hair from the meat as you skin. Remove hair from the meat as you skin.
Butchering/Boning
It is preferable to proceed with the butchering/boning process while the animal is still hanging and immediately after skinning. All boned out meat should be placed in plastic tubs that can be covered with plastic wrap and temporally refrigerated for later final processing. Roast and steak sections should be segregated from burger meat etc. Covering the tubs will prevent crusting/drying until final processing. After removal, all bone should be properly disposed.
If you lack a clean space to hang the carcass and clean areas for cutting and wrapping the meat, you should consider having the meat aged, butchered and wrapped by a commercial facility. Arrangements should be made in advance so the meat can be taken directly to the butcher. Request that the meat be boned and all fat removed and discarded. If you decide to do the butchering yourself, you should have the following:
 Sharp knives Sharp knives Bone saw Bone saw Clean butcher paper covered table to lay the meat Clean butcher paper covered table to lay the meat Plastic wrap/butcher paper or vacuum packing material Plastic wrap/butcher paper or vacuum packing material
There are different ways for butchering/boning animals and the following discussion covers an approach that works well with deer 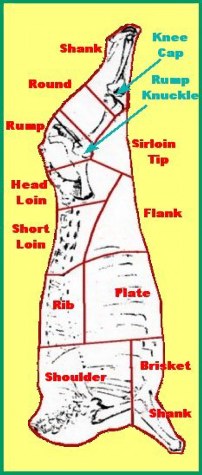 sized animals and quartered larger animals. Keep in mind that deer size animals can be also handled in two section - the front half and the hind quarters. sized animals and quartered larger animals. Keep in mind that deer size animals can be also handled in two section - the front half and the hind quarters.
 The first step is to carefully go over the carcass and remove all hair, contamination and blood shot areas that may be on the meat. The first step is to carefully go over the carcass and remove all hair, contamination and blood shot areas that may be on the meat.  For deer sized animals, when the carcass is hanging from the head, remove the hind quarters by cutting above the second or third rib from the backbone to the belly. Repeat on the opposite side at the same rib location. Then from the outside of the carcass, cut through the loin to connect the two cuts and saw through the spinal vertebrae at this point to separate the hind quarters from the rib cage. For deer sized animals, when the carcass is hanging from the head, remove the hind quarters by cutting above the second or third rib from the backbone to the belly. Repeat on the opposite side at the same rib location. Then from the outside of the carcass, cut through the loin to connect the two cuts and saw through the spinal vertebrae at this point to separate the hind quarters from the rib cage.  The hind quarters can be taken to the boning table. At this point, the tenderloins should be removed from both sides of the backbone inside the lower rib cage. The hind quarters can be taken to the boning table. At this point, the tenderloins should be removed from both sides of the backbone inside the lower rib cage. Here, one approach for boning is to remove the legs at the pelvic section rump knuckle. This is a little difficult until you have seen it done or have done it once yourself. Here, one approach for boning is to remove the legs at the pelvic section rump knuckle. This is a little difficult until you have seen it done or have done it once yourself.  Spread the legs as much as possible. Spread the legs as much as possible.  Looking from the inside, or belly side of the carcass, begin cutting the meat around the pelvis by keeping the blade as close to the pelvis as possible. Looking from the inside, or belly side of the carcass, begin cutting the meat around the pelvis by keeping the blade as close to the pelvis as possible.  At some point you will encounter tendons that are holding the hip joint (rump knuckle) in the socket. At some point you will encounter tendons that are holding the hip joint (rump knuckle) in the socket.  Sever all of the tendons and the ball will fall out of the socket. Sever all of the tendons and the ball will fall out of the socket.  Continue cutting to remove the entire leg from the carcass. Continue cutting to remove the entire leg from the carcass.  Boning of the individual legs can proceed as described below. Boning of the individual legs can proceed as described below.  An alternate method, with the legs still attached to the hind quarters, is to bone the sirloin tip, round and shank sections from each leg and placed them in a tub. The boned hind leg(s) can now be removed at the pelvic joint (rump knuckle) and disposed. An alternate method, with the legs still attached to the hind quarters, is to bone the sirloin tip, round and shank sections from each leg and placed them in a tub. The boned hind leg(s) can now be removed at the pelvic joint (rump knuckle) and disposed. For the remaining parts of the hind quarter(s), remove the loin steak section and then the rump section. Meat suitable for burger, stew, etc. should be removed and placed in a separate tub. For the remaining parts of the hind quarter(s), remove the loin steak section and then the rump section. Meat suitable for burger, stew, etc. should be removed and placed in a separate tub. The front quarters and neck still hanging can be removed by cutting around the meat to the neck vertebrae where it is joined to the head and then sawing through the vertebrae. These quarters can be taken to the boning table. The front quarters and neck still hanging can be removed by cutting around the meat to the neck vertebrae where it is joined to the head and then sawing through the vertebrae. These quarters can be taken to the boning table.  Here, working on one side at a time, one approach is to remove the front leg by pulling the shank of the leg away from the body and then slicing through what looks like an armpit between the shoulder blade and the ribs. The front leg is attached to the body entirely by muscle; there is no joint or knuckle between the shoulder blade and the ribs. The front leg can then be boned. Here, working on one side at a time, one approach is to remove the front leg by pulling the shank of the leg away from the body and then slicing through what looks like an armpit between the shoulder blade and the ribs. The front leg is attached to the body entirely by muscle; there is no joint or knuckle between the shoulder blade and the ribs. The front leg can then be boned.  A second approach, without initially removing the leg, is to remove the two shoulder roast sections form the outside of the shoulder blade and then by boning the underside of the blade, remove it at the arm bone knuckle and dispose. The meat can now be boned from the front leg and the leg disposed. A second approach, without initially removing the leg, is to remove the two shoulder roast sections form the outside of the shoulder blade and then by boning the underside of the blade, remove it at the arm bone knuckle and dispose. The meat can now be boned from the front leg and the leg disposed.  Bone out the rib steak section and the meat outside the rib cage, brisket and neck. Repeat the boning for the other side of the rib cage. Again, keep the steak/roast meat separate from the burger, stew meat, etc.. The meatless rib cage can be disposed. Bone out the rib steak section and the meat outside the rib cage, brisket and neck. Repeat the boning for the other side of the rib cage. Again, keep the steak/roast meat separate from the burger, stew meat, etc.. The meatless rib cage can be disposed.
Another method for butchering/boning large animals that have not been quartered is described in detail, with photographs, in a publication prepared by the University of Wyoming, Skinning and Boning Big Game. This approach works well if you have adequate clean space to hang a large animal otherwise its best to work quartered sections as described above.
Final Processing
Lay individual boned meat sections on a clean butcher paper (shiny side up) lined area and remove sinew, hair, dirt/bloodshot areas and all fat.
 Game fat has a tendency to turn rancid while in the freezer. Game fat has a tendency to turn rancid while in the freezer.  Fat not removed prior to packaging can be removed prior to cooking. Fat not removed prior to packaging can be removed prior to cooking.
Separate into steaks, roasts, stew meat and meat to be ground into burger.
 About 10-20% beef fat added to the meat during grinding will produce a tasty and lean hamburger. About 10-20% beef fat added to the meat during grinding will produce a tasty and lean hamburger.  Large muscles can be removed intact and then sliced cross-grain into roasts or steaks. Large muscles can be removed intact and then sliced cross-grain into roasts or steaks.  Some people prefer to save as many good roasts as are available because they can be cut into steaks before cooking as needed. Some people prefer to save as many good roasts as are available because they can be cut into steaks before cooking as needed.  Examples of muscles (meat) that make excellent roasts and steaks are: Examples of muscles (meat) that make excellent roasts and steaks are:  The rib and loin steaks that run on each side of the backbone on the outside of the carcass. The rib and loin steaks that run on each side of the backbone on the outside of the carcass. The round which extends from the knee cap to the rump knuckle on the back side of the hind leg. The round which extends from the knee cap to the rump knuckle on the back side of the hind leg. The sirloin tip that is on the front side of the hind leg opposite the round. The sirloin tip that is on the front side of the hind leg opposite the round.  Roasts and steaks can also be cut from the front shoulders of larger animals like elk and moose. Roasts and steaks can also be cut from the front shoulders of larger animals like elk and moose.
Dispose of the bones and skin in an appropriate manner. (Some areas have skin drives for charity if you choose not to tan your hide).
|
|
 last Supply of Elk has Spoiled in the repeeted rains which has been fallen ever Since our arrival at this place,-We discover that part of our last Supply of meat is Spoiling from the womph of the weather not withstanding a constant Smoke kept under it day and night.
 temperature and humidity controlled cooler, similar to those used by a butcher or meat marker.
 skinned after the aging period. If you skin the animal earlier, it will lead to a dried crust of meat on the outside of the carcass. This will cause overall drying of the meat and will need to be trimmed off before packaging.
  sized animals and quartered larger animals. Keep in mind that deer size animals can be also handled in two section - the front half and the hind quarters.